Outdoor Faucet & Hose Bib Inspection Guide for Spring
By Magic Flow Plumbing | Serving Lake Stevens, Bellevue, Kirkland & the Greater Seattle, WA Area 📞 425-666-8363
It’s one of the first things you do when spring arrives — you walk outside, twist the hose bib open, connect the garden hose, and get back to yard work. Simple. Routine. Forgettable.
Except this year, there’s a drip that wasn’t there before. Or the water pressure feels off. Or you notice a damp patch on the interior wall right behind that outdoor faucet, and suddenly what should have been a five-second task turns into a question you’d rather not answer: did something freeze and crack over winter?
In the Greater Seattle, WA area — including Lake Stevens, Bellevue, and Kirkland — we don’t get the brutal extended freezes that hit the Midwest, but we do get enough below-freezing nights to quietly damage outdoor plumbing. The tricky part is that freeze damage rarely announces itself loudly. A pipe that cracked slightly in January might drip for months before it fails completely — and by then, you might be dealing with water damage inside your wall, not just a worn-out faucet outside.
At Magic Flow Plumbing, we handle a steady stream of outdoor faucet repairs every spring, and almost every one of them could have been a smaller, cheaper fix if the homeowner had caught it earlier. That’s why we put together this step-by-step guide — so you know exactly what to look for, how to test your system, and when a simple DIY fix is enough versus when it’s time to call in a professional.
What Is a Hose Bib, and Why Does It Freeze?
A hose bib (also called a spigot or outdoor faucet) is the threaded valve on the outside of your home where you attach a garden hose. Most homes have at least one; many have two or three placed around the exterior.
The reason outdoor faucets are so vulnerable to freeze damage is simple: they’re exposed. Unlike the pipes running through your insulated walls and heated interior spaces, the portion of pipe that connects to your outdoor faucet is directly up against — or outside — your exterior wall. When temperatures drop below 32°F overnight, that water can freeze, expand, and either crack the pipe itself or damage the internal valve mechanism.
Newer homes in the Lake Stevens and Bellevue areas are often equipped with frost-free hose bibs — a style designed with a longer stem that shuts off water several inches inside the wall rather than at the exterior face. These are more freeze-resistant, but not freeze-proof. If a hose was left connected to a frost-free bib during a freeze, or if the bib is installed at the wrong angle, they can still sustain damage.
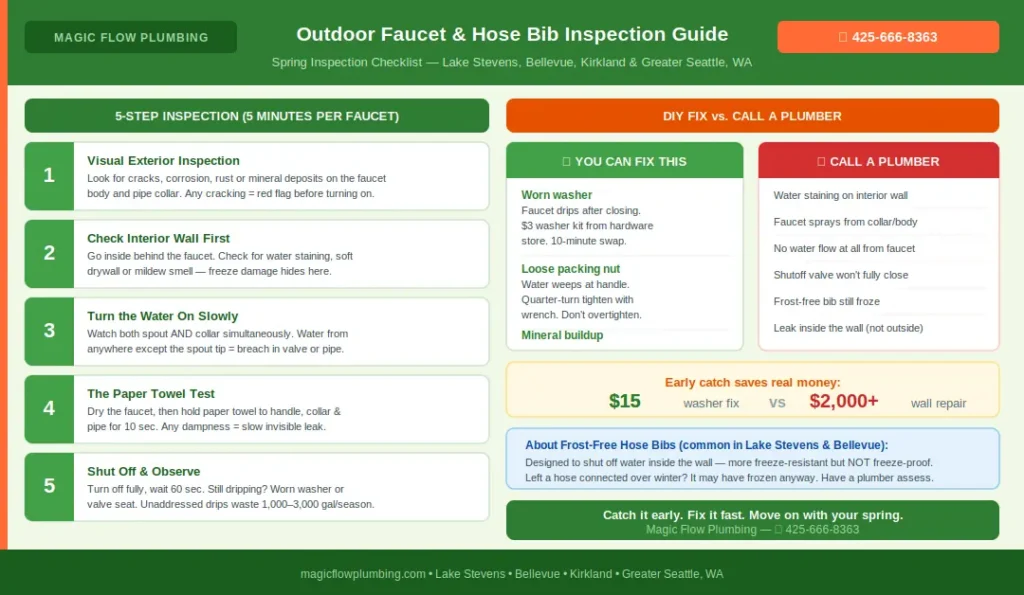
Step-by-Step: How to Inspect Your Outdoor Faucets This Spring
Work through this inspection on every outdoor faucet on your property. It takes about five minutes per faucet and requires nothing more than your eyes, your hands, and a piece of dry paper towel.
Step 1: Visual Exterior Inspection
Before you turn anything on, look at the faucet itself. Get close. You’re looking for:
- Cracks or splits in the faucet body or the pipe collar where it exits the wall
- Corrosion or rust around the base or handle
- Mineral deposits (white or greenish buildup) that indicate previous slow leaking
- Physical damage — dents, bends, or a handle that moves stiffly or loosely compared to normal
Any cracking in the faucet body is a red flag regardless of what the faucet does when you turn it on. Even a hairline crack will worsen under water pressure.
Step 2: Check the Interior Side First
Go inside and find the wall directly behind the outdoor faucet. This is usually a utility room, garage wall, or kitchen cabinet. Look for:
- Water staining on the drywall or wood framing
- Soft, warped, or discolored drywall indicating moisture behind the surface
- Mold or mildew smell, even without visible signs
- Dripping or wet insulation if the wall cavity is accessible
This interior check is critical because it’s where freeze damage often hides. A cracked pipe inside the wall can drip slowly for months, hidden entirely from the exterior. If the interior looks clean and dry, good — continue to Step 3.
Step 3: Turn the Water On Slowly
Open the faucet slowly and let it run for 30 seconds. Watch the faucet face and the point where the pipe exits the wall simultaneously. Look for:
- Water spraying from the side of the faucet rather than cleanly from the spout
- Dripping from the collar where the faucet meets the exterior wall
- Reduced or uneven pressure compared to other faucets
Normal flow should be steady and originate entirely from the spout. Any water appearing from somewhere other than the tip of the spout indicates a breach somewhere in the valve or pipe.
Step 4: The Paper Towel Test
With the faucet running, dry the faucet body and the pipe collar with a paper towel, then hold the dry towel against each section — the handle, the collar, the pipe connection — for 10 seconds. Any dampness appearing on the towel indicates a leak that may be too slow to see with the naked eye but is absolutely losing water.
Step 5: Shut Off and Observe
Turn the faucet off completely. Wait 60 seconds, then check the spout. A faucet in good working order should stop dripping within a few seconds of being closed. If it continues to drip — even slowly — the internal washer or valve seat is worn and the faucet is leaking even when “off.”
A dripping faucet left unaddressed from spring through summer can waste 1,000–3,000 gallons of water. That’s money dripping onto your foundation all season long.
Warning Signs That Mean Call a Plumber — Don’t Wait
Some findings from the inspection above are easy DIY repairs: a new washer, a tightened packing nut, a drip that stops with a wrench. But certain warning signs mean the problem is beyond the faucet itself and requires a licensed plumber.
Call Magic Flow Plumbing at 425-666-8363 if you notice any of the following:
- Water staining or soft drywall on the interior wall behind the faucet. This means the pipe inside the wall has been leaking, and opening that wall to assess and repair the damage is not a DIY job.
- A faucet that sprays from the collar or pipe body rather than the spout. This indicates a cracked pipe, not just a worn washer.
- No water flow at all from an outdoor faucet that previously worked. A completely blocked or frozen pipe that didn’t thaw properly may have collapsed internally.
- The shut-off valve for the outdoor faucet won’t close fully. Many outdoor faucets have a dedicated shut-off inside the home. If that valve is corroded or stuck, it needs replacement before you have an emergency situation.
- A frost-free bib that still froze. If your home has frost-free hose bibs and one still sustained freeze damage, the bib may be improperly pitched (it needs a slight downward slope to drain completely), or it was left with a hose attached. Either way, a plumber should assess the installation.
DIY Repairs You Can Handle Yourself
Not every issue needs a service call. Here’s what most handy homeowners can tackle on their own:
Replacing a worn washer: If the faucet drips after being closed, the rubber washer at the tip of the valve stem has worn out. Shut off the water supply to that faucet from inside, remove the handle and packing nut, pull the stem, and swap the washer. Hardware stores in the Lake Stevens and Kirkland areas carry universal faucet washer kits for a few dollars.
Tightening the packing nut: If water is weeping around the handle (not the spout), the packing nut just behind the handle may need a quarter-turn tighten with a wrench. Don’t overtighten — snug is enough.
Cleaning mineral buildup: White crusty deposits around the spout or connections are cosmetic and can be removed with white vinegar and a soft brush. They don’t indicate a structural problem unless accompanied by active dripping.
Don’t Skip the Hose Bib Inspection This Spring
An outdoor faucet feels like a minor piece of your home’s plumbing. And in most cases, a spring inspection takes less time than it takes to find where you stored the garden hose. But that five-minute walkthrough is the difference between a $15 washer repair and a $2,000 wall repair — and we’ve seen that exact scenario play out for homeowners across the Greater Seattle, WA area every single spring.
The goal isn’t to make you anxious about your plumbing. It’s to give you the knowledge to catch problems when they’re still small, cheap, and easy to fix.
If your inspection turns up anything beyond a simple washer replacement — or if you’d simply rather have a licensed plumber do a thorough evaluation — Magic Flow Plumbing is ready to help. We serve Lake Stevens, Bellevue, Kirkland, and the surrounding Greater Seattle, WA region with fast, honest, and affordable outdoor plumbing repairs.
📞 Call us at 425-666-8363 to schedule your outdoor faucet inspection or repair today.
Catch it early. Fix it fast. Move on with your spring.